Introduction to FRC Robot Wiring
Note
This document details the wiring of a basic electronics board for the Kitbot using components provided in recent Kit of Parts. For a more general reference to wiring which includes other components, see Introduction to FRC Robot Wiring
Overview
Diagram courtesy of FRC® Team 3161 and Stefen Acepcion.
Gather Materials
Locate the following control system components and tools
Kit Materials:
Power Distribution Hub (PDH)
roboRIO
Vivid Hosting VH-109 radio (may be already installed on Kitbot)
Robot Signal Light (RSL) (may be already installed on Kitbot)
6x SPARK MAX
120A Circuit breaker
4x 40A Circuit breaker
1x 30A Circuit breaker
6 AWG (16 \(mm^2\)) Red wire
18 AWG (1 \(mm^2\)) Red/Black wire
Vivid Hosting PoE Injector cable or similar
14 Wago 221 inline splicing connector with lever
2x Anderson SB50 battery connectors
6 AWG (16 \(mm^2\)) Terminal lugs
12V Battery
Red/Black Electrical tape
Dual Lock material or fasteners
Zip ties
1/2in (12mm) plywood
Tools Required:
Very small flat head screwdriver (eyeglass repair size)
Wire cutters, wire stripper (6, 10, 18, 22 AWGs), and terminal crimper (6AWG terminal) or vice
7/16in (11mm may work if imperial is unavailable) box end wrench or nut driver
Additional 7/16in wrench/nut driver or Philips head screw driver
Scissors
Drill with 1/4in (6mm) bit
Create the Base for the Control System
The instructions below heavily rely on the wiring pre-attached to components. The layout provided is designed around using a single board which mounts to the top of the inner rails of the AM14U chassis. Teams are welcome to modify this design and layout but note that additional connectors and wire may be required.
Layout the Core Control System Components
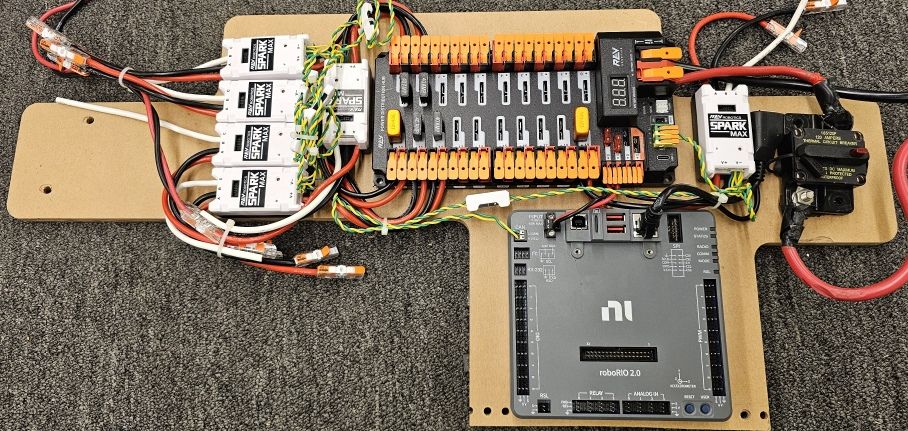
Lay out the components on the board. An example layout is shown in the image above. The radio and RSL will be mounted directly to the Kitbot superstructure. It is recommended to wire as much as possible before installing the board in the robot, the board is difficult to work on while installed. The board has very little clearance between the PDH and the bottom of the hopper, locate the PDH as far towards the back of the robot as possible while still allowing room for wires between the PDH and roboRIO.
Motor Controller Power
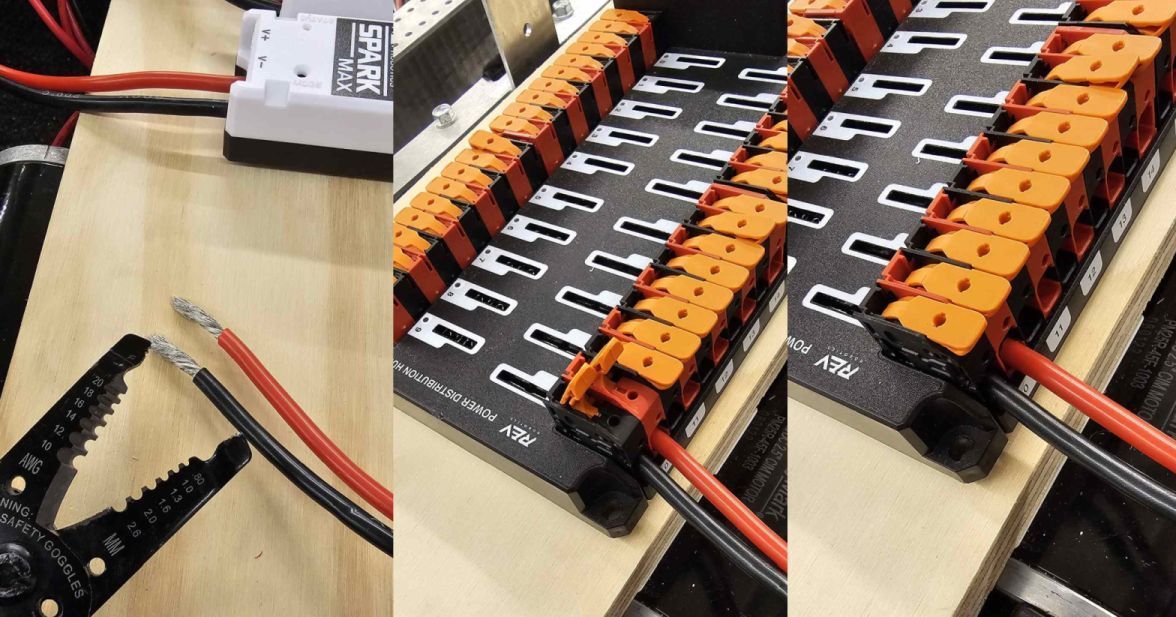
Requires: Wire Stripper
Connect each motor controller’s input power (red/black side with no white) to the PDHs high current output channels.
Details
Strip approximately 1/2 in. (~12mm) of insulation off the red and black power input wires for one SPARK MAX. While the SPARK MAX wire is 12 AWG, because it is high strand count, the 10 AWG size on your wire strippers may work better.
Lift both levers on the PDH for one high current channel until they latch open (the red and black terminals for one channel are indicated by the white label across them below and behind the terminals).
Carefully insert the stripped wire all the way into the terminals and press the latches back down to secure the wires.
Repeat for each controller. Pay attention to which controllers wire to which channel to ensure all controllers will reach without extension.
Tip
If the wire end has become a bit messy and is hard to insert cleanly, a small twist (~ 1/2 a turn) may help. Do not heavily twist the wire, this prevents the terminal inside the PDH from making solid contact with the wire.
Fasten Components

Requires: Recloseable fastener, scissors, drill with bit
Cable ties plus reclosable fastener make a great pair for securing robot electronics. The cable ties help hold the components down while the recloseable fastener helps hold them in place. The instructions below describe securing your electronics with this method, though you may choose to use hardware (nuts and bolts) to secure some components instead.
Details
Secure each item down with recloseable fastener. One easy way to do this is to secure the two sides of the fastener together, peel one backing, secure the fastener(s) to the component, then peel the other backing and carefully press the component into place on the board. To ensure you have enough fastener for both electronics and the battery door, some recommended lengths are provided below:
SPARK MAX: 2x 1 in. pieces each
roboRIO: 4x 1 in. pieces
PDH: 3x 2 in. pieces (or 4x 1 in.)
120A Breaker: 2x 2 in. pieces
Mark hole locations for drilling ziptie holes
SPARK MAX: 2x holes centered between each SPARK MAX (1 aligned with each ziptie notch) plus 2x just outside each outer controller. 2 cable ties will pass through each hole.
PDH: 1 hole directly underneath each device mounting hole (4x total), 1 holes just outside the device footprint near each mounting hole (4x total)
roboRIO: 1 hole directly underneath each ziptie notch (4x total), 1 hole just outside the device footprint near each mounting hole (4x total)
120A breaker: 1 hole directly underneath each device mounting hole (2x total), 1 hole just outside the device footprint near each mounting hole (2x total)
Remove components and drill holes. Using a “rocking” or “peeling” motion can often help remove components from recloseable fastener without removing the fastener adhesive.
Place the components back down on the boards. You may wish to wait to actually secure components with cable ties until wiring is complete. Some cable ties may be able to double as wire management.
CAN Bus connections - SPARK MAXes
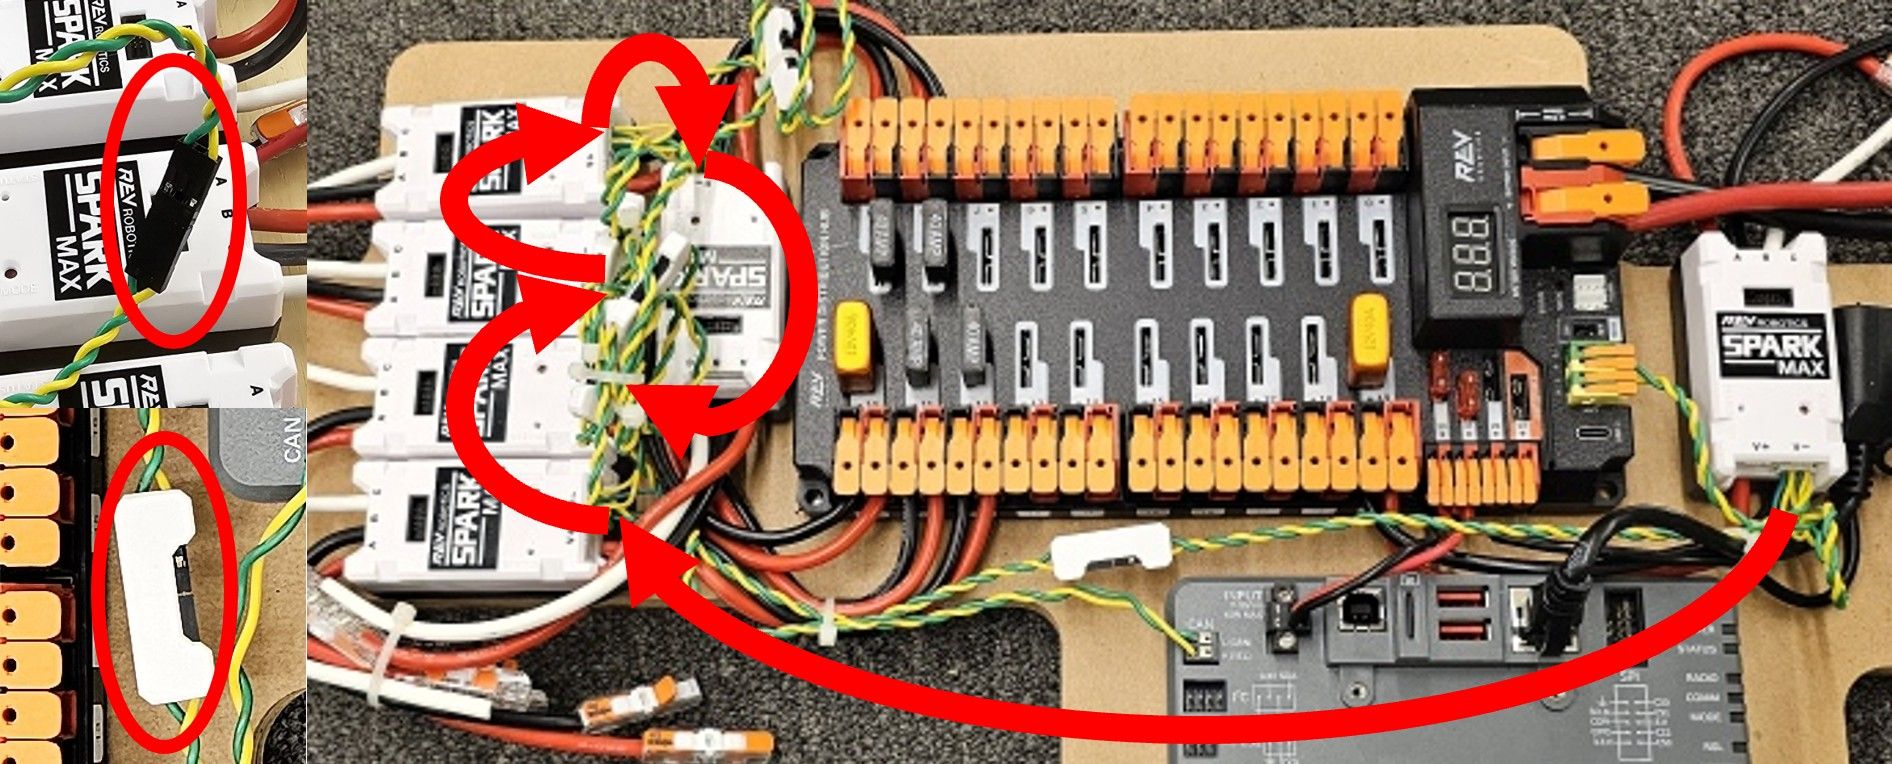
Requires: SPARK MAX CAN Cables and Cable retention clips (found in SPARK MAX boxes)
The SPARK MAX controllers and PDH will communicate with the roboRIO over CAN. Connect the SPARK MAX CAN cables in a chain, skipping the 3rd controller and coming back to it, as shown by the red arrows.
Details
Insert a SPARK MAX CAN Cable into each SPARK MAX.
Starting with the single SPARK MAX near the roboRIO, take either end of the CAN cable and connect to the opposite end of the CAN cable from the SPARK MAX closest to the battery notch.
Secure the connection by placing a Cable retention clip over the joined connectors.
Using the remaining end from the SPARK MAX near the battery notch skipping the controller directly above connect to the third SPARK MAX in the cluster of four.
Then connect from the third SPARK MAX to the fourth in the group, followed by the SPARK MAX closest to the PDH.
Finally, connect the last SPARK MAX, that you skipped earlier.
You should now have a chain that connects all the SPARK MAX controllers together with a free end on the SPARK MAX closest to the roboRIO and on the second controller in from the battery notch.
You may want to use cable ties to organize the extra CAN wire before moving on.
CAN Bus connections - PDH and roboRIO
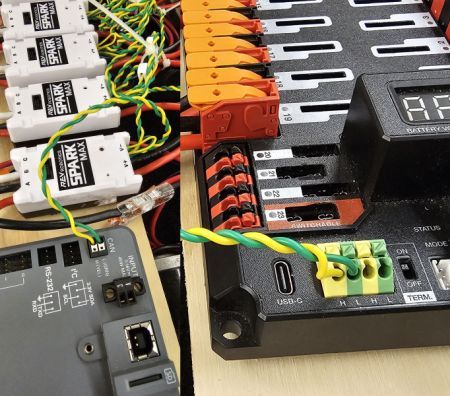
Requires: Wire cutters, wire stripper (22 AWG)
Connect one free end of the CAN bus chain to the PDH and the other to the roboRIO.
Details
Locate the free end of the CAN cable connected to the SPARK MAX in the group of four. Cut off the connector and strip 5/16in (~8mm) of both the yellow and green wire.
Insert each wire into the corresponding terminal on the roboRIO by holding down the white button with a fingernail or screw driver while inserting the wire. Give the wire a sharp tug to ensure it has been inserted properly.
Locate the remaining free end of the CAN chain (attached to the single isolated SPARK MAX). Cut off the connector and strip 3/8in (~9mm) of both the yellow and green wire.
Insert each wire into either matching colored terminal of the PDH by either depressing the button or opening the latch (depending on PDH version).
Ensure the PDH CAN termination switch (labeled “TERM” and located next to the CAN terminals) is set to ON. If not, adjust with a small screw driver.
Attach Robot Side Battery Connector
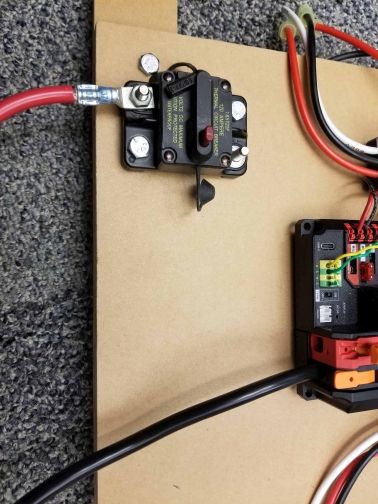
Requires: Battery Connector, 1x 6 AWG (16 \(mm^2\)) terminal lugs, 7/16in (11mm) Box end
Attach the red wire from the battery connector to the main breaker using a terminal lug and attach the black side to the power input of the PDH.
Details
Attach terminal lug to positive (red) wire of battery connector. Strip .75in off the black wire.
Lift the lever above the black main power input terminal on the PDH until it clicks into place. Insert the wire. Pull the lever down to secure the wire.
Using a 7/16in (11mm) box end wrench, remove the nut on the “Batt” side of the main breaker and secure the positive terminal of the battery connector
Wire Breaker to Power Distribution
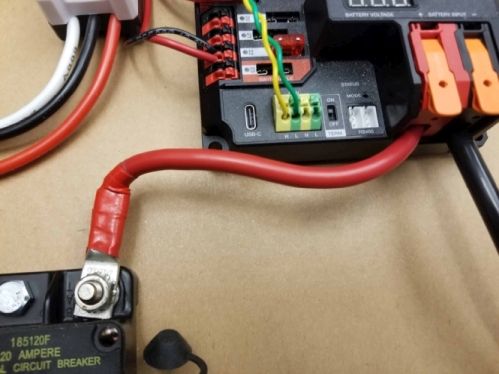
Requires: 6 AWG (16 \(mm^2\)) red wire, 1x 6 AWG (16 \(mm^2\)) terminal lugs, 7/16in (11mm) wrench
Connect 6AWG wire between the second terminal of the 120A circuit breaker and the red power input of the PDH
Details
Secure one terminal lug to the end of the 6 AWG (16 \(mm^2\)) red wire.
Using the 7/16in (11mm) wrench, remove the nut from the “AUX” side of the 120A main breaker and place the terminal over the stud.
Loosely secure the nut (you may wish to remove it shortly to cut and strip the other end of the wire). Measure out the length of wire required to reach the positive terminal of the PDH.
Cut and strip the other end of the red wire.
Using the 7/16” (11 mm) wrench, secure the wire to the “AUX” side of the 120A main breaker.
Lift the lever on the positive (red) input terminal of the PDH, insert the wire, then close the terminal.
Insulate power connections
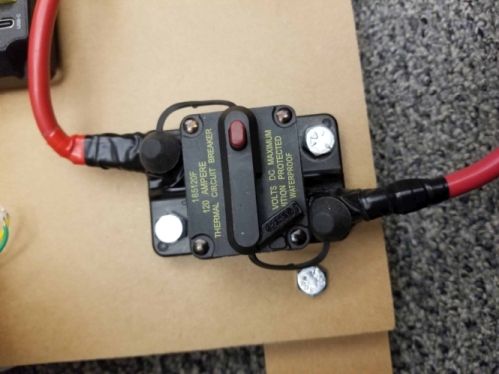
Requires: Electrical tape
Using electrical tape, insulate the two connections to the 120A breaker.
roboRIO Power
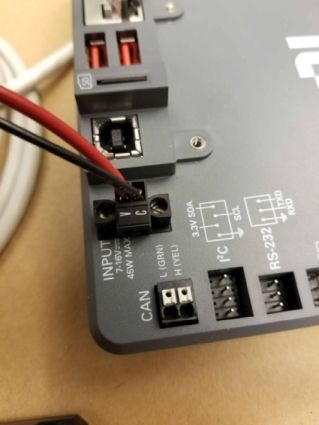
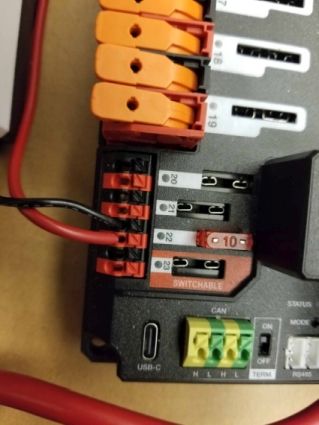
Requires: 10A mini fuse, Wire stripper, very small flat screwdriver, 18 AWG (1 \(mm^2\)) Red and Black
Using 18AWG wire, connect a non-switchable fused channel of the PDH (20-22) with a 10A fuse to the power connector of the roboRIO
Details
Insert the 10A fuse into the PDH in one of the non-switchable fused channels (20-22).
Strip ~5/16” (~8 mm) on both the red and black 18 AWG (1 \(mm^2\)) wire and connect to the corresponding terminals on the PDH channel where the fuse was installed
Measure the required length to reach the power input on the roboRIO. Take care to leave enough length to route the wires around any other components such as the battery and to allow for any strain relief or cable management.
Cut and strip the wire.
Using a very small flat screwdriver connect the wires to the power input connector of the roboRIO (red to V, black to C). Also make sure that the power connector is screwed down securely to the roboRIO.
Radio Power
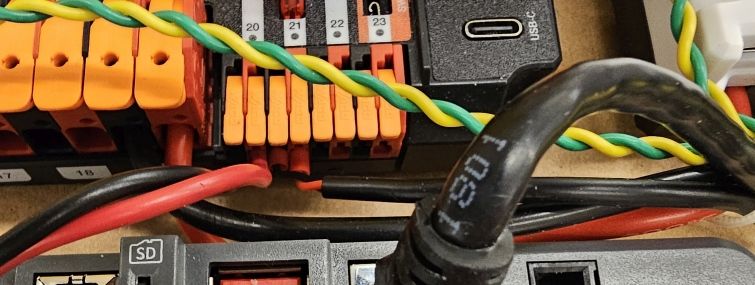
Requires: Vivid Hosting PoE adapter cable
Connect the PoE adapter cable to a non-switchable fused channel (20-22) with a 10A fuse to power the VH-109 radio.
Details
Insert the 10A fuse into the PDH in one of the non-switchable fused channels (20-22).
Lift the levers of the PDH terminals for that channel, insert the ferrules from the red and black wires on the PoE adapter into the corresponding terminals, then close the levers.
Connect the Ethernet plug of the PoE adapter to the roboRIO.
Warning
The Vivid PoE adapter works opposite of the REV PoE adapter. The REV PoE adapter can not be directly substituted for the 2026 KitBot. If the Vivid PoE adapter is not available, wire power directly to the radio 12V port and connect the roboRIO to the AUX2 port if the radio is not the V1.5 hardware revision.
Circuit Breakers
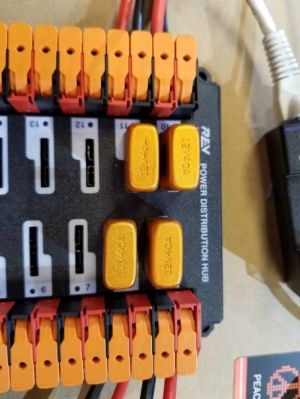
Requires: 6x 40A circuit breakers
Insert 40-amp Circuit Breakers into the positions on the PDH corresponding with the Wago connectors the motor controllers are connected to. Note that the white graphic indicates which breakers are associated with which terminal pairs.
Pause

If you are preparing the wiring outside the robot, pause at this point. The remaining wiring must be completed after the board is installed on the robot.
Ethernet Cable
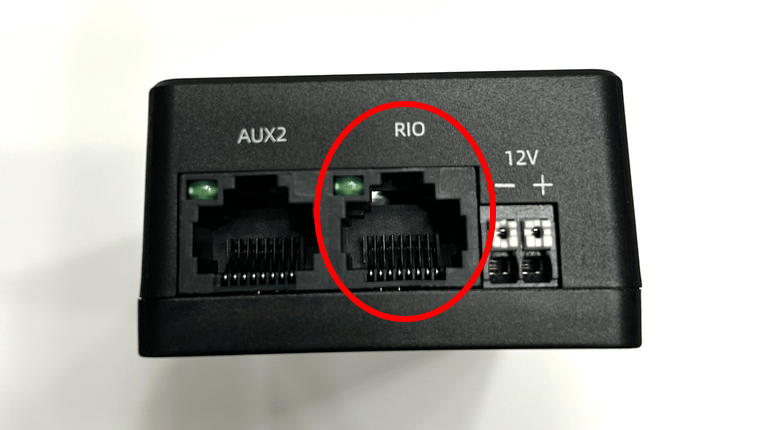
Requires: 1x Ethernet cable
Connect an Ethernet cable from the RJ45 (Ethernet) socket of the PoE adapter to the RIO port on the VH-109 radio.
Robot Signal Light
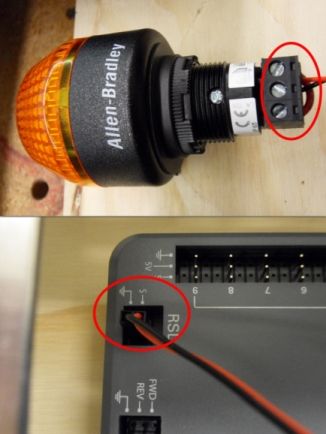
Requires: Wire stripper, 2 pin cable with Molex jacket from Molex box, Robot Signal Light, 18 AWG (1 \(mm^2\)) red wire, very small flat screwdriver
Using the 2 Pin Molex cable, connect the roboRIO RSL port to 2 terminals of the RSL (black wire in the middle) and using 18AWG red wire, jumper the outside two ports together.
Details
Using a small flat screwdriver, ensure the terminals of the RSL wiring connector are open.
Take the loose end of the 2 pin cable (or cut off one connector if both ends have connectors) and Insert the black wire into the center, “N” terminal and tighten the terminal.
Strip the 18 AWG (1 \(mm^2\)) red wire and insert into the “La” terminal and tighten the terminal.
Cut and strip the other end of the 18 AWG (1 \(mm^2\)) wire to insert into the “Lb” terminal
Insert the red wire from the two pin cable into the “Lb” terminal with the 18 AWG (1 \(mm^2\)) red wire and tighten the terminal.
Connect the two-pin connector to the RSL port on the roboRIO. The black wire should be closest to the outside of the roboRIO.
Motor Power
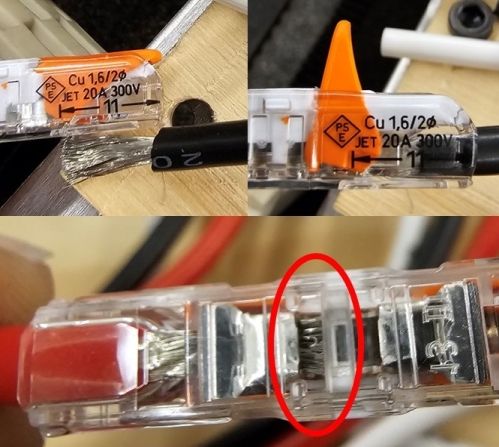
Requires: Wire stripper, 14x Wago 221 terminals, 12AWG wire
For each motor, use the Wago 221 terminals to connect the output of the motor controller to the motor. A recommended arrangement is to use the isolated SPARK MAX for the feeder motor, the other single SPARK MAX for the intake/launcher, and the four grouped SPARK MAXes for the Drivetrain, split into pairs for each side. Note that for the intake/launcher motor, an additional intermediate connection is recommended in order to have the necessary length to route the wire safely along robot elements.
Details
Using the print on the side of the 221 connector (upper left image) as a guide, strip 11mm from the end of one wire.
Lift the orange lever of the 221 connector until it latches up, then insert the wire fully into the terminal. Flip the lever back down.
Using the inspection window on the bottom of the connector, check that the wire is fully inserted by verifying the wire is visible beyond the metal funnel of the terminal.
Repeat this process to connect each drivetrain CIM motor and the feeder motor directly to a motor controller output, red-to-red, black-to-black.
For the intake/launcher motor, it is recommend to use 12AWG wire as an extension. Attach 12AWG wire to the motor wires, then run the wire along robot components until you reach the motor contoller. Cut and strip the 12AWG extension wire and secure to the motor controller output.
STOP

Danger
Before plugging in the battery, make sure all connections have been made with the proper polarity. Ideally have someone that did not wire the robot check to make sure all connections are correct.
Start with the battery and verify that the red wire is connected to the positive terminal
Check that the red wire passes through the main breaker and to the + terminal of the PDP and that the black wire travels directly to the - terminal.
For each motor controller, verify that the red wire goes from the red PDP terminal to the V+ terminal on the motor controller (not M+!!!!)
For each non-motor controller device, verify that the red wire runs from a red terminal on the PD and connects to a red terminal or terminal labeled + or V on the component.
Tip
It is also recommended to put the robot on blocks so the wheels are off the ground before proceeding. This will prevent any unexpected movement from becoming dangerous.
Manage Wires
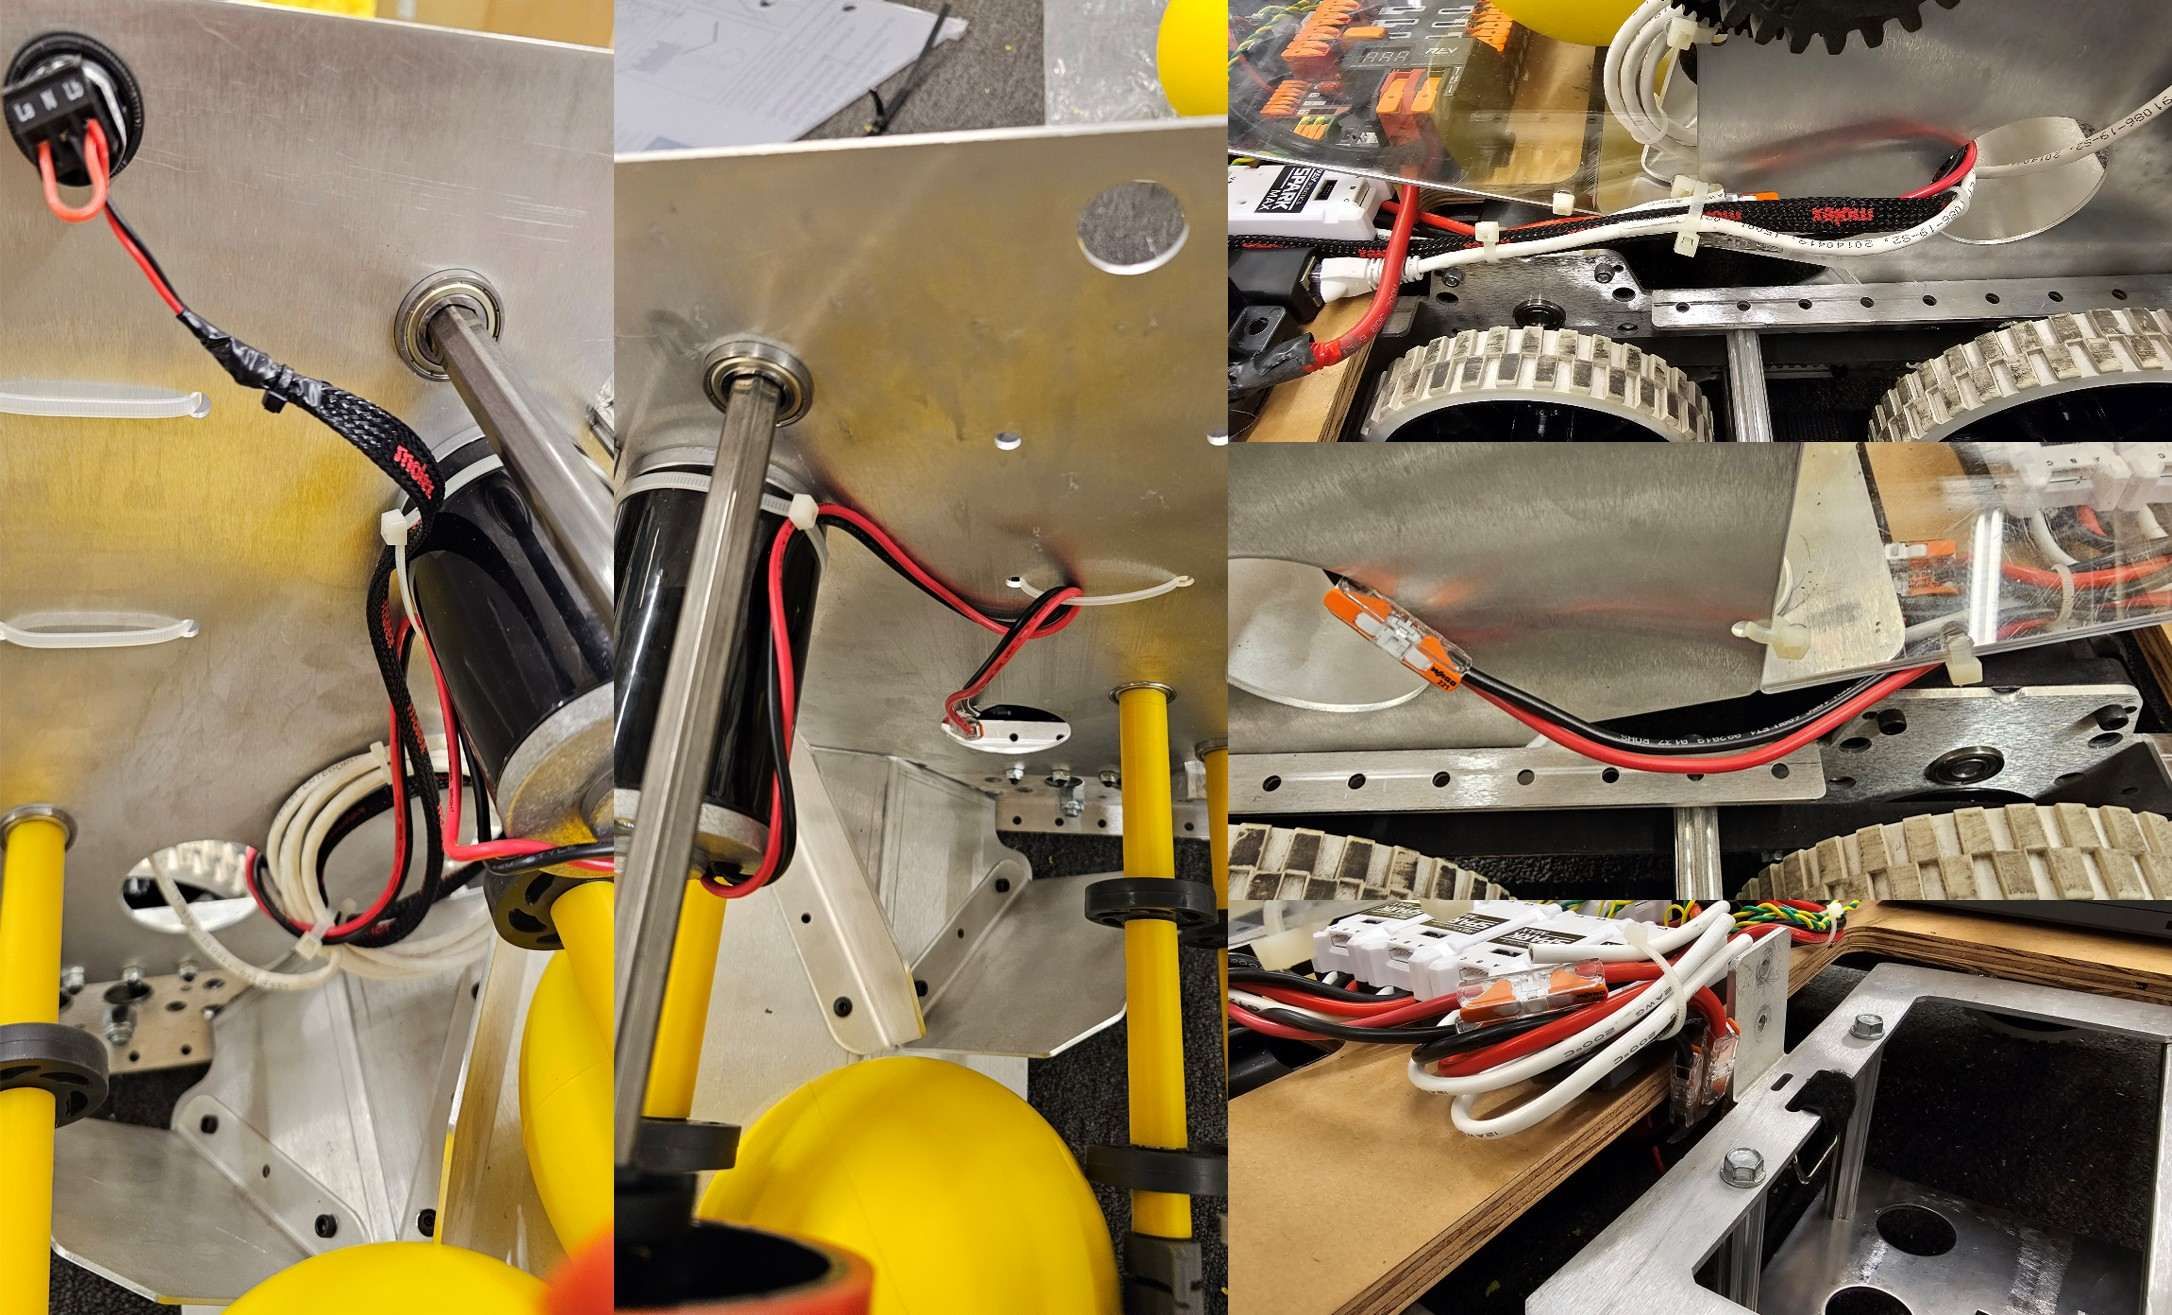
Requires: Zip ties
Tip
Now may be a good time to add a few zip ties to manage some of the wires before proceeding. This will help keep the robot wiring neat and protected. Secure wires to robot components to make them less likely to be caught and pulled by other robots, or when performing robot maintenance. Make sure wires are not pulled too tight (don’t put any strain on connection points) and that they do not have enough slack to reach moving components (such as drivetrain belts) while the robot is operating.
Warning
If you are passing wires through any of the openings in the KitBot sheet metal, it is recommended to shield the edge of the metal, the wires passing through, or both, to avoid wire damage. Electrical tape or Gaffers tape work well for this purpose.
Connect Battery
Connect the battery to the robot side of the Anderson connector. Power on the robot by moving the lever on the top of the 120A main breaker into the ridge on the top of the housing.
If stuff blinks, you probably did it right. If you hear any clicking, or see any smoke, power the system off immediately, clicking is likely the sound of circuit breakers tripping.
Before moving on, if using SPARK MAX controllers, there is one more configuration step to complete. The SPARK MAX motor controllers are configured to control a brushless motor by default. You can verify this by checking that the light on the controller is blinking either cyan or magenta (indicating brushless brake or brushless coast respectively). To change to brushed mode, press and hold the mode button for 3-4 seconds until the status LED changes color. The LED should change to either blue or yellow, indicating that the controller is in brushed mode (brake or coast respectively). To change the brake or coast mode, which controls how quickly the motor slows down when a neutral signal is applied, press the mode button briefly.
Tip
For more information on the SPARK MAX motor controllers, including how to test your motors/controllers without writing any code by using the REV Hardware Client, see the SPARK MAX Quickstart guide.
From here, you should continue on to install software and configure your radio and roboRIO, then load up the provided KitBot code.